Styling an unfenced road
While putting together examples for some GeoServer training materials I came across a note that you could create custom WKT marks in your SLD file. This example shows how to create a pair of dashed lines for a line, which got me thinking about fenced and unfenced roads, in the UK the Ordnance Survey styles roads (at least at large scales) with a dashed line along the side of the road that is unfenced.

While it is easy to draw a road with a solid line down both sides, all you do is
draw a thick black (or blue) line and then a thinner white line down the middle.
It is also quite easy to draw an unfenced road since you can simply draw a
dashed black (or blue) line using the SLD dash-array operator and then again
draw a white a line down the middle of the road.
The problem that always arose before when I turned my mind to this issue is that it is hard to create the roads that are fenced on one side and unfenced on the other as until now the underlying road casing has always been drawn as a single line. But if I can define the “mark” that is used to draw the line using well known text (WKT) then this becomes much more possible.
<FeatureTypeStyle>
 <Rule>
  <Stroke>
     <GraphicStroke>
      <Graphic>
        <Mark>
          <WellKnownName>
            wkt://MULTILINESTRING((-0.25 -0.25, -0.125 -0.25),
             (0.125 -0.25, 0.25 -0.25), (-0.25 0.25, 0.25 0.25))
          </WellKnownName>
          <Fill>
            <CssParameter name="fill">#00000</CssParameter>
          </Fill>
          <Stroke>
            <CssParameter name="stroke">#000000</CssParameter>
            <CssParameter name="stroke-width">1</CssParameter>
          </Stroke>
        </Mark>
        <Size>6</Size>
      </Graphic>
    </GraphicStroke>
  </Stroke>
 </Rule>
</FeatureTypeStyle>
<FeatureTypeStyle>
  <Rule>
    <LineSymbolizer>
      <Stroke>
        <CssParameter name="stroke-width">4</CssParameter>
        <CssParameter name="stroke">0xffffff</CssParameter>
      </Stroke>
    </LineSymbolizer>
  </Rule>
</FeatureTypeStyle>
This gives a map that looks like:
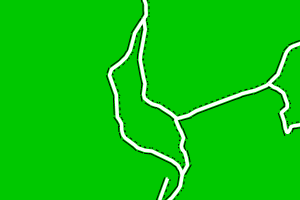
For my next trick I’ll look at how to draw Byways and Restricted Byways: